In response to
Phil's comment about my bricks, I thought I'd do an article specifically on Linka scenery and how it can be adapted to 15mm.
For those who haven't encountered it before, Linka is a range of thin rubber moulds which can be used to cast interlocking panels to create walls, roofs etc. They come in a variety of styles including brick, stone and roof tile. There are moulds for plain wall sections, windows, doorways and more. I cast mine using Crystacal R casting plaster, the same as I use for my Hirst Arts dungeons.
The scenery used in my Action Force photographs is built without modification (other than breaking and crumbling on the ruins) but the doorways look slightly too large when viewed more closely.
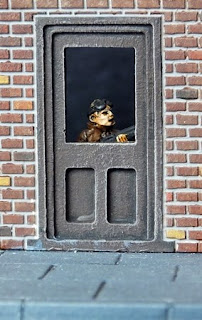
 |
| Standard door |
I
was fortunate enough to pick up some Linka moulds on ebay a few months
ago, the basic set comprising 4 moulds:
1) plain brick sections;
2) a
basic assortment of door and window sections;
3) accessories (garden
walls, coping, angled walls etc);
4) roof tiles & chimney pots.
 |
| Basic Linka moulds |
Being
designed for OO/HO railways and 1/72 or 1/76 modelling, the standard
blocks look OK from a distance but the size discrepancy with 15mm
figures is much more obvious close-up. My initial experiments were just
to see how easy they were to stick together and how well they could be
painted. My next experiment is how well they can be adapted for 15mm
scale.
 |
| Door and window |
 |
| Window |
 |
| Door with window |
Regardless
of whether 15mm means to the top of the head, to the eye level, or just
1/100 scale, I have found that reducing the height of the standard
panels by 4 layers of bricks gives a pretty good size match for my
various figures. This was easily achieved with the plain brick
sections, I simply scored along the appropriate mortar line a few times
with an old dental tool (a craft knife would do the job pretty easily
too), then snapped off the lower 4 courses of bricks. I scored the
plaster before it had dried fully - it was set hard and easy to de-mould
but not quite as brittle as when it is completely dry. I've tried this
on some previously cast pieces since then, they are harder and require a
few more scrapes with the dental tool to score them deeply enough but
it's still fairly easy. The key thing when snapping them is to place
something underneath the scored line (eg handle of dental tool, small
paintbrush, knitting needle) and press evenly on both sides, just like
snapping a scored ceramic wall tile. The snapped-off sections are ideal for small bund walls like you find around liquid storage tanks.
 |
| Off cuts suitable for use as bund walls |
With
door sections, the door frame needs to be scored carefully as well as
the cement lines and the door itself often needs to be removed because
the inset panels are the wrong size. One particular difficulty with
door panels is removing the actual door, this can result in the entire
section breaking in half, more on this in part 2...
 |
| A range of doors and windows |
Windows
are more difficult - if you remove the lower 4 brick courses, the
bottom of the window is at ground level! While this might be desirable
in some instances, most of the time it will look rather odd so I've
removed the middle 4 brick courses. This requires a little more care
because both edges need to be quite accurate to ensure a clean fit of
the two halves and the centre section tends to snap rather easily. With
doors and plain wall sections, it doesn't matter if the base edge is a
little rough because you can hide it quite well by judicious application
of vegetation or other base texturing. Careful sanding is required,
though it's easy to remove too much, as I discovered.
 |
| Re-sized window and door |
In part 2 I'll move on to assembling a couple of trial buildings.


No comments:
Post a Comment